Listen to this article...
One of the most difficult things any homeowner can attempt when redecorating their homes is hanging wall paper. It can get messy really quickly and for people new to hanging wall paper it can be equally frustrating. This blog post will give you some ideas on how to hang wall paper effectively. There are certain tools needed to hang wallpaper which make the whole job a lot easier.
Choosing A Suitable Wallpaper
When considering which wallpaper to choose you should consider the colours and pattern printed on the paper. Wallpaper with intricate patterns are much more difficult to hang than more plain patterns, trying to match the patterns up on each run of paper is essential to achieving a professional look.
Wall paper is sold in rolls, how many times will you cut the roll down to hang it? Generally people do not like having excess wallpaper on their hands and so they often choose how many metres of wallpaper they need for a particular room. If you are trying to match up patterns between different rows there should be at least one metre of overlap between the two. It is always advisable to buy more than you need to account for errors when hanging wallpaper.
Tools Needed To Hang Wall Paper
- a sharp knife,
- a tape measure,
- a bucket (for your paste),
- a wall paper pasting brush
- two sponges. The first sponge should be kept damp in order to wipe off any excess wall paper glue, the dry sponge should be used to help smooth out any air bubbles which may form under the paper as you hang it.
- You will also need a pasting table to roll your paper out ready to apply the glue / paste.
- Finally a spirit level to ensure your paper is applied straight.
Measuring And Cutting The Wall Paper
When measuring a length of wall paper you should always allow extra for aligning the patterns within the design, depending on the size of the pattern you may need to allow for up to 2ft of paper extra at each end.
When measuring using your tape measure, always measure twice and cut once, measure the height of the wall, mark the paper and then allow extra as discussed above. Before cutting, double check your measurements! This may seem a little excessive but it will help avoid mistakes and reduce wastage.
Finally, when you’re happy that you have the correct measurements, cut the paper with a pair of sharp scissors or a sharp Stanley Knife.
Applying Wallpaper Paste
With the paper rolled out onto your pasting table you are ready to apply paste using the pasting brush (or decorators paint roller if you prefer). When applying wallpaper paste you should always make sure you apply plenty, and ensure all edges are covered with paste. Paste should be evenly distributed on the back of the paper. The paste will actually help you position the paper when you come to hang it, it will allow you to push the paper around on the wall in order to make sure joints and patterns match up. Before you hang the wall paper you should leave it a few minutes for the paste to penetrate the paper.
An optional but highly recommended step would be to apply a thin layer of paste directly to the wall before the paper is hung, this helps to prevent a dry wall surface from absorbing the paste on the back of your paper too quickly.
Booking or Folding The Paper
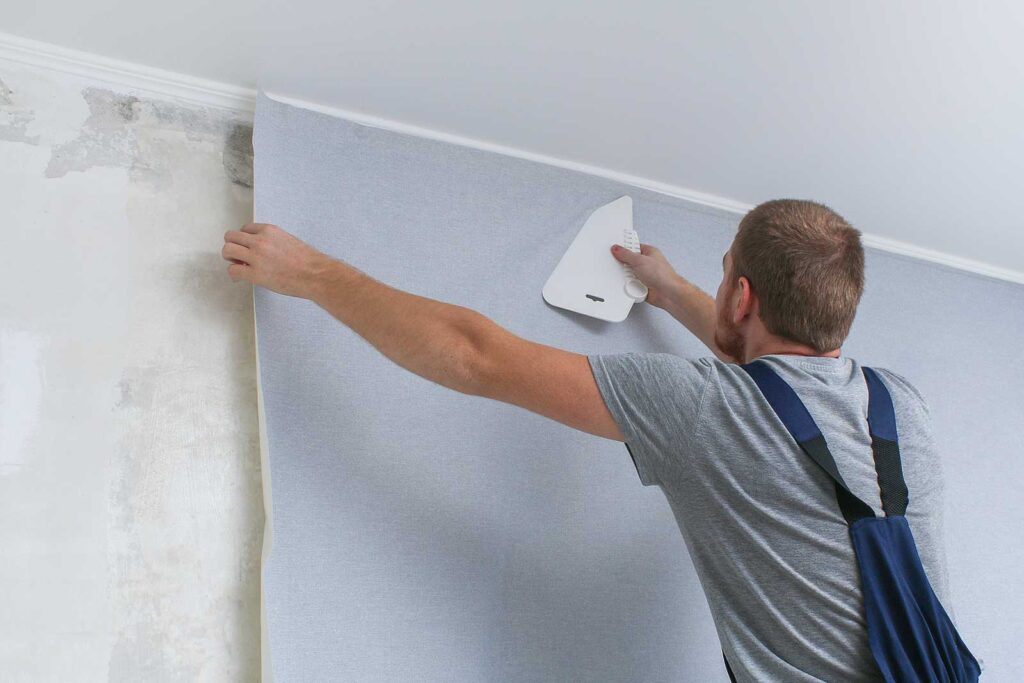
Hang Your Paper From The Top Down
Before hanging your paper you should use a spirit level and draw a vertical line which is absolutely plumb on the wall. The paper should then be lined up to this line when hanging, ensuring your paper goes onto the wall straight.
It is always recommended that you hang the paper from the top down, align the top edge of paper leaving a bit of overlap to the top of the wall where it meets the ceiling, you can then unfold the paper vertically down the wall, lining it up with the adjacent pieces.
Cheaper wall paper can sometimes shrink when the paste dries, in this case you should allow for this with a 2mm overlap over the joints between paper runs. Once dry this will shrink back to create a flush joint on the wall. You can always manipulate the paper during the drying process to get this joint just right.
Smooth Out The Paper
Once your length of paper is on the wall you may notice air bubbles under the paper, this is extremely common when doing it for the first time. After a bit of practice you will find yourself smoothing the paper at the same time as hanging it with either a sponge or a smoothing tool.
When smoothing out air bubbles, be careful not to move the paper away from your vertical line or the adjacent piece of paper, you should always smooth from the centre of your paper towards the edges. Smoothing helps to remove any air bubbles and it also pushes any excess wall paper paste towards the edges where they can easily be wiped away using a damp sponge.
Trim Off The Overlaps.
Once your length of wall paper is hung and properly lined up it is time to trim any excess overlapped paper from the top near the ceiling and the bottom near your skirting boards.
You should take care when trimming the paper as if it is too wet when you try to cut the paper with a knife or scissors you may tear the paper, meaning you may have to replace that entire run. It is best practice to trim the paper after a short amount of drying time.
If you are using a sharp blade to trim the paper you can usually do this in situ, however if you are using decorators scissors you should peel the paper back slightly then cut along a folded line, replacing the paper and re-smoothing it out again back into place.